Identifying Common Warning Lights
Understanding the warning lights on your Toyota is crucial for maintaining its optimal performance and safety. These lights, often small icons or symbols, alert you to potential issues that require attention. Ignoring them could lead to more significant problems and costly repairs down the line. Knowing what each light signifies can help you address problems promptly.
Common Warning Light Meanings
Toyota vehicles use a variety of warning lights to indicate different issues. This section provides a comprehensive overview of common warning lights and their general meanings, offering a simplified explanation for easier understanding.
List of Common Warning Lights
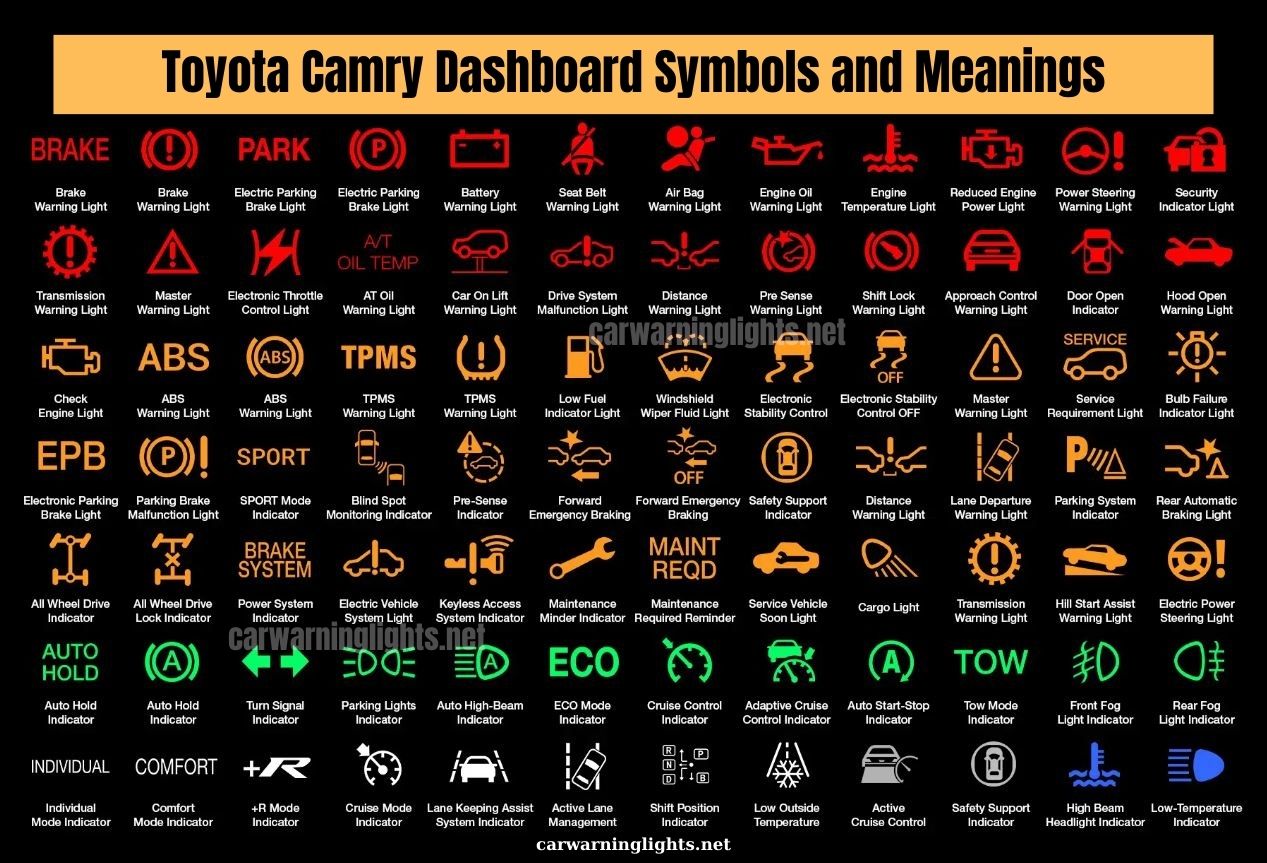
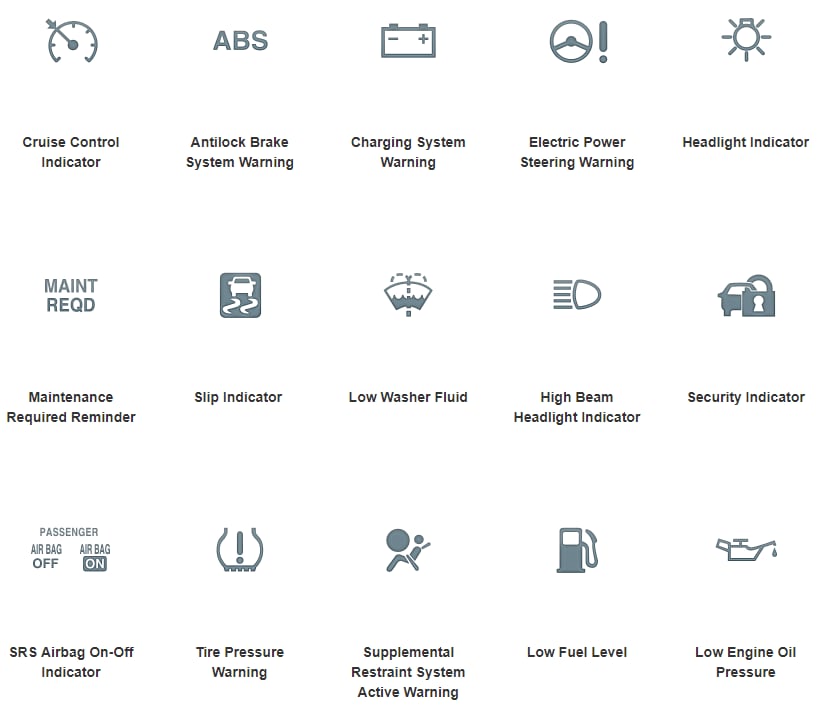
A wide array of warning lights can illuminate on your Toyota dashboard, each signifying a different potential problem. This list provides an alphabetical representation of common warning lights, along with their general meaning.
- Airbag Warning Light: This light indicates a problem with the airbag system, potentially impacting its deployment in a crash. It could signify a malfunctioning sensor, faulty wiring, or a need for replacement parts. Examples of Toyota models with this light include the Camry, Corolla, and RAV4.
- Battery Warning Light: This light typically signifies a problem with the vehicle’s electrical system, often related to the battery’s charge or output. Possible causes range from a weak battery to faulty alternator issues. This light is prevalent in various Toyota models.
- Brake Warning Light: A malfunctioning braking system is indicated by this light. This could include issues with brake pads, rotors, calipers, or the brake fluid level. Examples of models with this light include the Prius, 4Runner, and Tacoma.
- Check Engine Light: This light is a common warning indicator, often related to a problem within the engine’s performance. It could signify various issues, including misfires, emissions problems, or a sensor malfunction. This is a frequently encountered warning light in many Toyota models.
- Low Tire Pressure Warning Light: This light alerts you to a low tire pressure condition, potentially impacting the vehicle’s stability and fuel efficiency. It’s important to check and adjust tire pressure promptly. Common Toyota models affected by this light include the Yaris, Camry, and Highlander.
- Oil Pressure Warning Light: This light indicates a problem with the engine’s oil pressure. A low oil pressure could cause engine damage. This warning light is essential to check for potential issues in all Toyota models.
- Parking Brake Warning Light: This light signifies that the parking brake is engaged when the vehicle is in motion. This can result from a failure of the parking brake system or a simple oversight by the driver. This warning light is commonly found on all Toyota models.
- Power Steering Warning Light: This light indicates a potential problem with the power steering system. A malfunctioning power steering system can make steering the vehicle difficult. This warning light is common in Toyota vehicles.
- Steering Angle Sensor Warning Light: This light often points to a malfunctioning steering angle sensor, potentially impacting the vehicle’s stability and control systems. This light is common across various Toyota models.
Visual Representation of Warning Lights
The table below summarizes common warning lights and their meanings for easy reference.
| Light Symbol | Light Name | General Meaning |
|---|---|---|
 |
Airbag Warning Light | Problem with the airbag system. |
 |
Battery Warning Light | Problem with the vehicle’s electrical system, often related to the battery. |
 |
Brake Warning Light | Malfunctioning braking system. |
 |
Check Engine Light | Problem with the engine’s performance. |
 |
Low Tire Pressure Warning Light | Low tire pressure. |
Troubleshooting Specific Warning Lights
Understanding the illuminated warning lights on your Toyota is crucial for maintaining its performance and safety. Ignoring these signals can lead to potential mechanical issues, reduced fuel efficiency, and even safety hazards. This section delves into the importance of context, interpreting combinations, and determining the severity of these alerts.
Troubleshooting warning lights requires a systematic approach. Simply seeing a light illuminate isn’t enough; consider the driving conditions, recent maintenance, and any other unusual occurrences. This holistic perspective helps differentiate between minor alerts and serious mechanical problems.
Understanding Warning Light Context
Identifying the context surrounding a warning light’s appearance is essential. Factors such as driving speed, road conditions, and recent maintenance procedures all contribute to a proper interpretation. A check engine light illuminated during a spirited drive on a mountain road may have a different cause than one appearing during a routine city commute.
Determining Light Severity
Determining if a warning light signifies a minor alert or a serious issue requires careful consideration. A single warning light might indicate a relatively simple fix, such as a low tire pressure. However, a combination of lights or a persistent light can signal a more significant problem, possibly requiring immediate attention. Consider the duration of the light’s illumination. A momentary flash might be a minor issue, while a persistently illuminated light warrants immediate investigation.
Interpreting Warning Light Combinations
Warning light combinations can provide valuable clues about potential issues. For instance, a combination of a low tire pressure warning light and an ABS light might indicate a problem with the braking system or a malfunctioning sensor. Careful analysis of multiple warning lights can provide a more complete picture of the potential problem.
Potential Warning Light Combinations and Causes
| Warning Light 1 | Warning Light 2 | Potential Causes | Recommended Actions |
|---|---|---|---|
| Check Engine Light | Low Oil Pressure Light | Low oil level, damaged oil pump, or internal engine damage. | Immediately pull over to a safe location. Do not continue driving. Contact a qualified mechanic for inspection and repair. |
| Brake Light | ABS Light | Malfunctioning brake sensor, brake fluid leak, or damage to the ABS system. | Do not drive the vehicle. Contact a qualified mechanic for inspection and repair. Braking performance will be compromised. |
| Low Tire Pressure Light | Steering Wheel Vibration | Uneven tire pressure, damaged wheel alignment, or possible suspension issue. | Check tire pressure and inflate as needed. If the vibration persists, have the wheel alignment and suspension inspected by a qualified mechanic. |
| Battery Light | Alternator Light | Battery failure, alternator failure, or a short circuit. | If the car is immobile, have the battery and alternator checked. If driving, pull over to a safe location and have the vehicle towed to a mechanic. |
Understanding Warning Light Causes
Understanding the potential causes behind your Toyota’s warning lights is crucial for preventative maintenance and avoiding costly repairs. A comprehensive understanding allows you to address issues promptly, potentially preventing further damage and ensuring the longevity of your vehicle. This section delves into the various causes behind common warning lights, providing detailed explanations and illustrative examples.
Knowing why a warning light illuminates can help you quickly determine if the issue is minor, requiring simple adjustments, or more significant, potentially necessitating professional intervention. A well-informed driver can react appropriately to warning lights, mitigating potential damage to the vehicle and potentially saving money.
Potential Causes of Low Tire Pressure Warning Light
Low tire pressure often triggers a warning light. This can result from slow leaks, uneven wear, or simply forgetting to check the pressure regularly. Tire pressure significantly affects vehicle handling, fuel efficiency, and tire life. Regular checks are essential for safety and maintaining optimal performance. For example, a sudden drop in tire pressure might be caused by a puncture or a slow leak.
Potential Causes of Overheating Warning Light
Several factors can lead to an overheating warning light. A faulty thermostat, a malfunctioning cooling fan, or a leak in the cooling system can all contribute to overheating. Insufficient coolant levels, a clogged radiator, or a damaged water pump can also trigger this warning light. For instance, a significant increase in ambient temperature combined with heavy use could stress the cooling system, leading to overheating and the activation of the warning light. This issue requires prompt attention as overheating can cause severe engine damage.
Potential Causes of Engine Malfunction Warning Light
The engine malfunction warning light encompasses a wide range of potential problems. Issues with the engine’s electrical components, such as the ignition system, fuel injectors, or sensors, can trigger this light. Problems with the engine’s mechanical components, like the timing belt or valves, could also cause the warning light to illuminate. For example, a misfiring cylinder, identified by a lack of power or erratic engine behavior, might be indicated by this warning light.
Potential Causes of Brake System Warning Light
A brake system warning light often signifies issues with the brake system’s components. A low brake fluid level, a malfunctioning brake sensor, or a problem with the brake lines can trigger this warning light. For example, a worn brake pad or rotor can cause the light to come on, indicating a need for replacement. This light demands immediate attention to avoid potential accidents.
Potential Causes of Other Warning Lights
Other warning lights can indicate a wide array of problems. A warning light related to the airbag system might be triggered by a faulty sensor or a malfunctioning airbag module. A warning light related to the battery might indicate a problem with the charging system. Understanding the specific warning light and its potential causes is crucial for proper diagnosis.
| Light | Causes | Symptoms | Solutions |
|---|---|---|---|
| Low Tire Pressure | Slow leaks, punctures, uneven wear | Warning light illuminates, uneven tire wear | Check tire pressure, repair punctures, inspect for leaks |
| Overheating | Faulty thermostat, cooling fan malfunction, coolant leak | High temperature gauge, steam from engine compartment | Check coolant level, inspect for leaks, replace faulty components |
| Engine Malfunction | Ignition system issues, fuel injector problems, mechanical problems | Rough idling, loss of power, unusual noises | Check engine codes, replace faulty components, inspect mechanical parts |
| Brake System | Low brake fluid, malfunctioning sensor, brake line problems | Warning light illuminates, reduced braking power | Check brake fluid level, inspect brake lines, replace worn parts |
Potential Solutions and Actions
Troubleshooting warning lights on your Toyota requires a systematic approach. Ignoring these indicators can lead to more significant and costly repairs down the line. This section provides step-by-step procedures for diagnosing and resolving various warning light scenarios.
Addressing warning lights isn’t about guesswork; it’s about methodical diagnosis. By following the Artikeld procedures and using the provided tools, you can effectively pinpoint the cause of the issue and implement the appropriate solution.
Diagnosing Engine Warning Lights
Proper diagnosis of engine warning lights involves a systematic approach. Begin by checking the vehicle’s owner’s manual for specific codes associated with the warning light. Next, use a diagnostic tool (OBD-II scanner) to retrieve the fault code. This code will provide valuable information about the specific system malfunction. Once the code is obtained, consult the appropriate diagnostic resources, like repair manuals or online forums, to understand the root cause of the problem.
- Low Engine Oil Warning Light: Check the engine oil level using the dipstick. If low, add the correct type and quantity of oil. If the light persists after adding oil, consult a mechanic to check for leaks or other issues.
- Check Engine Light (CEL): Use an OBD-II scanner to retrieve the fault code. Consult the owner’s manual or online resources for the specific code’s meaning. The code will indicate the system component requiring attention. Address the identified issue; this might involve replacing a sensor, fixing a wiring problem, or addressing a mechanical component malfunction.
- Battery Warning Light: Verify the battery’s terminal connections are clean and tight. Test the battery voltage using a multimeter. If the voltage is low, consider recharging or replacing the battery. If the issue persists, seek professional help to identify other potential problems.
Diagnosing Transmission Warning Lights
Transmission warning lights typically indicate issues with the transmission system. Careful observation and systematic checks are crucial to pinpoint the problem.
- Transmission Temperature Warning Light: Ensure the transmission fluid level is correct. Check for overheating conditions by visually inspecting the fluid’s temperature and observing the vehicle’s operating conditions. If overheating is suspected, have the transmission fluid flushed and replaced by a qualified technician.
- Transmission Failure Warning Light: Consult the owner’s manual for the specific code associated with the warning light. Identify the potential causes and use the proper tools to diagnose the issue. If the issue persists, seek professional assistance from a certified mechanic.
Troubleshooting Table
| Warning Light | Troubleshooting Steps | Necessary Tools |
|---|---|---|
| Low Engine Oil | 1. Check oil level using dipstick. 2. Add correct oil if needed. 3. If light persists, check for leaks. |
Oil dipstick, engine oil |
| Check Engine Light (CEL) | 1. Use OBD-II scanner to retrieve fault code. 2. Consult owner’s manual or online resources for code meaning. 3. Address the identified issue. |
OBD-II scanner, repair manual |
| Transmission Temperature | 1. Check transmission fluid level. 2. Inspect fluid temperature and operating conditions. 3. If overheating, have fluid flushed and replaced. |
Transmission fluid dipstick, temperature gauge |
Preventive Maintenance and Light Prevention
Proactive maintenance is crucial for Toyota vehicles, significantly reducing the likelihood of warning lights illuminating. Regular checks and inspections can identify potential problems early, preventing them from escalating into costly repairs. By following a consistent maintenance schedule, owners can maintain optimal vehicle performance and avoid unexpected breakdowns. This proactive approach also contributes to extending the lifespan of the vehicle.
Comprehensive preventive maintenance not only minimizes the occurrence of warning lights but also enhances the overall reliability and performance of your Toyota. A well-maintained vehicle is less prone to mechanical issues, leading to a smoother driving experience and potentially saving you money in the long run.
Regular Checks and Inspections
Consistent visual and mechanical checks are essential for identifying potential issues early on. This proactive approach can prevent minor problems from escalating into major repairs, thus avoiding the need for expensive emergency repairs. By inspecting various components, owners can address potential problems before they trigger warning lights.
Essential Maintenance Tasks
These tasks, if performed regularly, can prevent many warning lights from appearing. Regular maintenance tasks, such as checking fluids, inspecting belts, and examining hoses, contribute to the vehicle’s longevity and reduce the likelihood of costly repairs down the line.
- Fluid Checks: Regularly inspect engine oil, transmission fluid, coolant, and brake fluid levels. Adequate fluid levels are vital for optimal engine performance and prevent potential damage. Low fluid levels can lead to overheating, component damage, and warning lights activating.
- Belt and Hose Inspection: Visually inspect drive belts and hoses for cracks, wear, or damage. Damaged belts and hoses can lead to loss of power, engine failure, and potentially hazardous situations. Early detection and replacement of damaged components are crucial for avoiding warning lights.
- Tire Pressure and Condition: Check tire pressure regularly and ensure proper tire tread depth. Proper tire inflation and condition are vital for safe handling and fuel efficiency. Inadequate tire pressure can lead to premature wear and tear, triggering warning lights.
- Battery Condition: Examine the battery terminals for corrosion and ensure the battery is securely fastened. A failing battery can trigger various warning lights, impacting vehicle performance and potentially leading to a complete system failure.
- Brake System Inspection: Check brake pads for wear and ensure brake lines are intact. Insufficient brake components can lead to brake failure, potentially resulting in severe accidents. Regular inspection and timely replacement of brake parts are crucial for safety and preventing warning lights.
- Air Filter Check: Inspect the air filter for dirt and debris. A clogged air filter can reduce engine performance and efficiency. Replacing a clogged air filter promptly can prevent engine issues and avoid warning lights.
Adhering to Toyota Recommended Maintenance Schedule
The Toyota manufacturer provides a recommended maintenance schedule for optimal vehicle performance and safety. Following this schedule is crucial for preventing potential issues that could trigger warning lights. Toyota’s schedule Artikels specific tasks and intervals for optimal vehicle health.
Essential Maintenance Checks for a Toyota Vehicle
- Oil Changes: Change engine oil and filter according to the manufacturer’s recommendations. This ensures proper lubrication and prevents wear on engine components. Failing to adhere to the oil change schedule can result in engine damage and the activation of warning lights.
- Tire Rotation: Rotate tires regularly to ensure even wear and tear, improving tire lifespan. Ignoring tire rotation can cause uneven wear, triggering warning lights.
- Spark Plug Replacement: Replace spark plugs according to the manufacturer’s recommendations. Damaged or worn spark plugs can lead to engine misfires and inefficient fuel combustion, triggering warning lights.
- Coolant Flush: Flush the coolant system and replace the coolant every few years. Dirty coolant can lead to overheating and potentially damage vital engine components, activating warning lights.
- Brake Fluid Flush: Flush the brake fluid system regularly. Contaminated brake fluid can affect braking performance, potentially triggering warning lights and impacting safety.
- Air Filter Replacement: Replace the air filter at recommended intervals. A clogged air filter reduces engine performance and efficiency, triggering warning lights.
Visual Aids and Illustrations

Understanding the visual cues of warning lights is crucial for prompt and accurate diagnosis of potential vehicle issues. A well-designed dashboard with easily identifiable warning lights can help drivers react proactively to problems, preventing minor issues from escalating into major repairs. Knowing what each symbol means, where it’s located, and how it appears, allows for quicker responses and better maintenance strategies.
Warning Light Symbol Descriptions
Warning lights on a vehicle’s dashboard use a variety of shapes, colors, and locations to convey specific messages. These visual cues, when understood, significantly aid in identifying and addressing potential problems. Paying close attention to the visual characteristics of each light, such as its color, shape, and location, is key to understanding the underlying issue.
Dashboard Warning Light Locations
Warning lights are strategically positioned on the dashboard for easy visibility to the driver. Their placement is standardized across various Toyota models, typically grouped around the center console or instrument cluster, within clear sight of the driver. The precise location may vary slightly depending on the specific model year and trim level. This standardized placement aids drivers in quickly identifying potential issues.
Identifying Warning Lights by Visual Cues
The visual appearance of warning lights can significantly aid in determining the nature of the issue. A flashing light often indicates a more urgent problem, whereas a steady light might signify a less immediate concern. Color variations also provide clues; for instance, a red light typically signals a serious issue, while a yellow or orange light might suggest a warning or maintenance requirement. The size and intensity of the light can also provide further context.
Warning Light Symbol Table
| Symbol | Meaning | Location |
|---|---|---|
| A red, illuminated engine icon | Engine malfunction or overheating | Typically near the center of the dashboard, often within the instrument cluster |
| A yellow, illuminated battery icon | Low battery charge or charging system malfunction | Usually near the center of the dashboard, or in the instrument cluster |
| A flashing yellow brake light | Brake system malfunction or low brake fluid | Often on the instrument cluster, adjacent to the speedometer or other important dashboard indicators |
| A red, illuminated airbag icon | Airbag system malfunction or deployment | Generally near the center of the dashboard, or in the instrument cluster, with a dedicated area for warning indicators |
| A flashing amber or yellow tire pressure icon | Low tire pressure | Typically near the center of the dashboard, or in the instrument cluster, often positioned with other vehicle status indicators |
Advanced Troubleshooting Scenarios
Troubleshooting complex warning light situations often requires a systematic approach beyond basic checks. Unusual or infrequent warning light combinations can signal underlying issues requiring specialized diagnostics. Understanding these scenarios and the potential implications is crucial for effective repairs and preventing further damage. Careful observation of warning light sequences, combined with a thorough inspection, can lead to accurate diagnoses.
Complex Warning Light Combinations
Understanding the interplay of multiple warning lights is vital. Sometimes, a seemingly minor light triggers a cascade of other indicators, masking the root cause. A comprehensive diagnostic approach, including visual inspection and potentially using specialized diagnostic tools, is necessary to isolate the specific problem.
Warning Light Sequence Analysis
Analyzing the order in which warning lights appear can provide valuable clues. For example, if the engine warning light illuminates, followed by the battery warning light, and then the ABS light, this sequence could indicate a problem with the electrical system or the alternator. A systematic approach, considering the sequence and related symptoms, helps narrow down the possible causes.
Potential Implications of Warning Light Combinations
The following table Artikels potential implications of various warning light combinations. A combination of lights often indicates a more extensive problem than a single light. This is crucial for prioritizing repairs and ensuring the safety of the vehicle.
| Warning Light Combination | Potential Implications |
|---|---|
| Engine Warning Light + Brake Warning Light + ABS Warning Light | Possible issues with the braking system’s hydraulics or electrical components, potentially involving the ABS control module. |
| Engine Warning Light + Battery Warning Light + Check Engine Light | Possible alternator malfunction, potentially leading to electrical system instability and further damage to critical components. |
| Airbag Warning Light + Steering Wheel Warning Light + Instrument Panel Malfunction Warning Light | Indicates potential problems with the airbag system’s electrical wiring, or even a more severe issue with the vehicle’s electrical control unit, needing a specialist’s attention. |
| Low Tire Pressure Warning Light + ABS Warning Light + Engine Warning Light | Possible malfunction in the tire pressure monitoring system, or a combination of braking system and engine issues, requiring careful investigation. |
Diagnostic Tools and Procedures
Utilizing diagnostic tools like scan tools and multimeters can assist in isolating the source of the problem. These tools can provide detailed data about the vehicle’s systems, aiding in the diagnosis of complex warning light combinations. Specialized technicians often use these tools to read error codes and pinpoint the exact components needing attention.
Real-World Examples
A recent case involved a vehicle displaying a combination of engine, battery, and ABS warning lights. A scan tool revealed a failing alternator, causing voltage fluctuations and affecting various systems. Repairing the alternator resolved the warning lights and restored the vehicle’s functionality. Another example involved a customer experiencing intermittent airbag and steering wheel warning lights. Diagnostics revealed a faulty wiring harness, requiring replacement for a safe and reliable system. These examples illustrate the importance of a systematic approach to advanced troubleshooting.
Comparison of Warning Light Systems
Toyota’s warning light systems, while generally consistent, exhibit variations across different models and years. Understanding these differences is crucial for accurate interpretation and timely troubleshooting. Different models may utilize various light configurations, colors, and even display patterns, potentially leading to misinterpretations if not properly understood.
The evolution of Toyota’s technology has influenced the complexity and functionality of their warning light systems. As features and safety systems have advanced, so have the warning lights used to indicate potential issues. This evolution necessitates a deeper understanding of the specific warning light systems present in different Toyota models.
Differences in Warning Light Display and Interpretation
Variations in warning light display and interpretation exist across different Toyota models. These differences may involve the specific colors used for certain warnings, the arrangement of lights on the dashboard, and even the way a single light might indicate different issues depending on the model year. For instance, a yellow triangle with an exclamation point might signify a braking system malfunction in one model but a different issue in another. Thorough research into the specific model and year is crucial for correct interpretation.
Common Warning Light Patterns Across Models
Certain warning light patterns recur across various Toyota models. These patterns often signify general categories of problems, such as engine issues, electrical malfunctions, or transmission problems. For instance, a flashing check engine light frequently indicates a critical issue requiring immediate attention. Knowing these recurring patterns helps narrow down potential problems, allowing for more efficient diagnostics.
Comparison Table of Toyota Warning Light Systems
| Model Year | Model Name | Light System Characteristics | Potential Differences |
|---|---|---|---|
| 2010 | Camry | Predominantly uses solid-colored lights for warnings, with flashing lights for immediate alerts. Dashboard layout is relatively standard. | Early 2010 Camry models might have a slightly different arrangement of warning lights on the dashboard compared to later years. |
| 2015 | RAV4 | Utilizes a combination of solid and flashing lights, with some lights displaying multi-colored patterns. Some lights are placed on a dedicated section of the dashboard. | 2015 RAV4 models might have different light configurations for warning lights related to the vehicle’s hybrid system compared to the standard models. |
| 2020 | Highlander | Employs a more integrated warning light system, often combining information into a single display. The display might use icons and symbols, in addition to colored lights, to provide additional information. | 2020 Highlander might utilize a more advanced diagnostic system and thus warning lights might provide more detailed information compared to earlier models. Also, potential differences in light patterns for the infotainment system. |